What is a Version Control System (VCS)?

A Version Control System, often abbreviated as VCS, is a crucial tool in software development used to track and manage changes to a project's source code or files over time. It provides a systematic way for software development teams and individuals to collaborate, maintain a history of revisions, and control different versions of their code-based projects.

Commonly used Version Control Systems include Git, Subversion (SVN), Mercurial, and others. Git, in particular, has gained immense popularity due to its speed, distributed nature, and robust branching and merging capabilities. These VCS tools enable developers to efficiently track changes, work collaboratively, and manage code versions, ensuring the integrity and stability of software projects.

How Version Control Helps Programmers

Imagine this scenario: You're working on your code, and you realize that a recent change you made, about five days ago, has caused a problem. You'd like to go back to how your code was five days ago to fix it, but you can't just click "undo" because you've already saved and closed your code editor (PyCharm, in this case).

So, you're left with relying on your memory to remember all the changes you made and try to rewrite the code as it was five days ago. This can be frustrating and not very effective.

This is where version control systems step in to help. They allow us to manage and keep track of all the changes we make to our code over time. With version control, you can easily go back to a previous version of your code, making it a valuable tool for programmers.

Open A New Project in PyCharm

To prepare your PyCharm for testing, start by opening a new project in the application. As you create the new project, you can refer to the following details for guidance and reference.

Version Control using Git

Getting Started with Git

Git is a distributed version control system that tracks changes in source code during software development. It allows multiple collaborators to work on a project simultaneously, making edits, tracking revisions, and merging changes efficiently. Git's notable features include speed, flexibility, and robust branching and merging capabilities, making it an essential tool for managing and coordinating code development in both small and large-scale software projects.

In this tutorial, we'll focus on connecting Git with PyCharm. Before you begin the installation process, it's important to check if Git is already installed in your PyCharm. To do this, open PyCharm and navigate to the "terminal". Type the following code:

git

If you encounter errors, it indicates that Git hasn't been installed yet, and you should proceed with the installation process.

Installing Git in PyCharm (Mac):

  • Open the Terminal.
  • Type brew install git and press Enter to use Homebrew for the installation.

Installing Git in PyCharm (Linux):

  • Open the terminal.
  • Depending on your Linux distribution, you can use the package manager like apt, yum, or dnf. For example:
  • For Debian/Ubuntu-based systems: sudo apt-get install git
  • For Red Hat/Fedora-based systems: sudo yum install git or sudo dnf install git

Installing Git in PyCharm (Windows):

  • Open the Command Prompt or PowerShell.
  • You can download the Git installer for Windows from the official Git website (https://git-scm.com/download/win) and follow the installation wizard.

Verifying Git Installation in PyCharm

To ensure that Git is properly installed in PyCharm, follow these steps. After installing Git, restart your PyCharm. Then, open the terminal within PyCharm and type the following command:

git 

This command will help you determine if Git is correctly configured and available for use within PyCharm.

Integrating Git with PyCharm

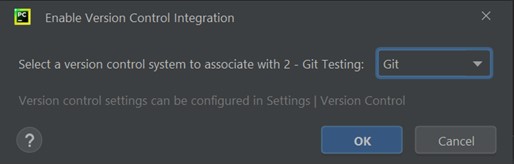
To integrate Git with PyCharm, follow these steps. First, locate the main navigation bar and click on "VCS". From there, select "Enable Version Control Integration..." This process will link your PyCharm project with Git, enabling version control features for your codebase, such as tracking changes, committing, and collaborating with others.

Version Control with Git

You can expect another window to appear; in this window, choose "Git" and then click "OK."

Version Control with Git

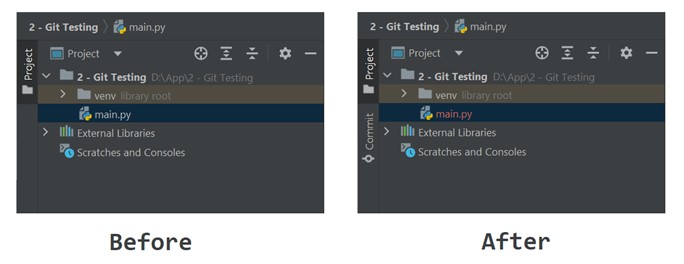
If you've noticed that in the left box of your PyCharm, some file names, like "main.py", are shown in red, it means that these files are not currently being tracked by Git, the version control system. In other words, Git is unaware of these files and doesn't include them in its monitoring. To address this, you need to take action to make Git aware of these files by adding them to what's called the version control registry, also known as a repository. Essentially, Git keeps a record of all the files and folders in your project, and it needs to know about these untracked files so it can monitor and manage them effectively.

Version Control with Git

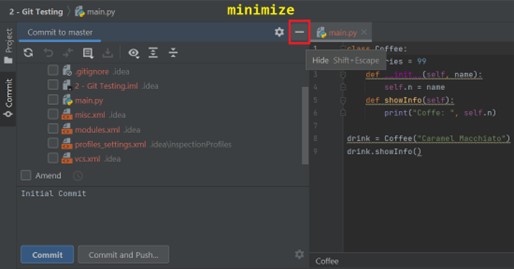
To make Git start monitoring a file, you have to perform a "commit" operation. To do this, simply click on the green checkmark icon located at the top right corner of the PyCharm window.

Version Control with Git

Once you click the green checkmark icon, it opens a new window on the side of PyCharm. In this window, you'll notice a blinking cursor at the bottom, and it's waiting for you to type something. This is where you enter what's called a "commit message". It should be short and meaningful, like a regular sentence, and it's used to describe what you've done.

In our case, we're creating a timestamp to mark the starting point of our project. This helps us keep track of changes. Typically, for the first timestamp, we use "initial commit" as the message.

Version Control with Git

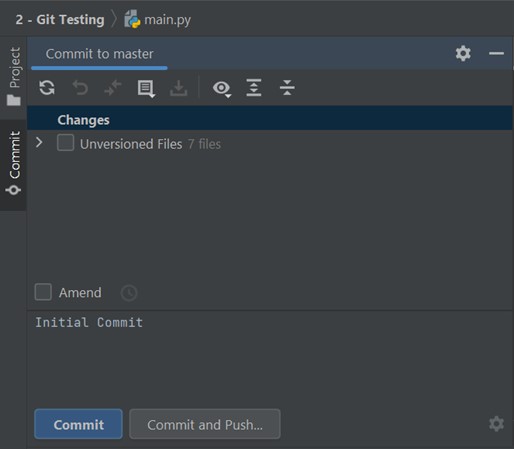
To select the files you want to commit, start by expanding the "Unversioned Files" section. Here, you'll see all the files in your project directory, including the automatically generated gitignore file and your Python files like main.py. You might also notice some settings files created by PyCharm; these are typically unnecessary for version control. To focus on your project files, minimize the "commit" tab, and navigate to your project directory. This ensures you're only including the essential project-related files in your commit.

Version Control with Git

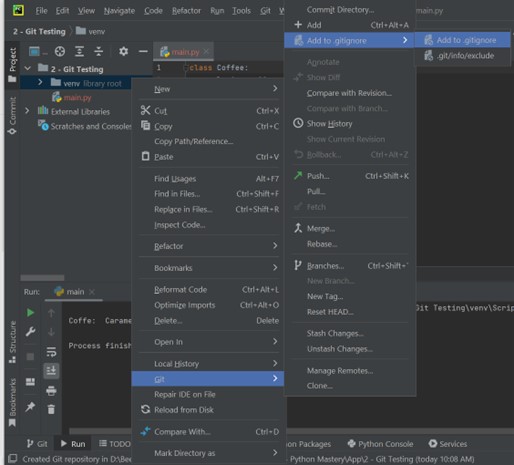
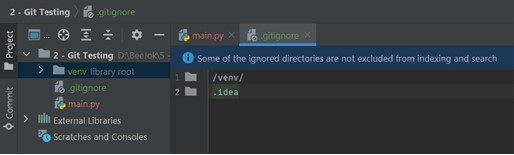
When you navigate to your project directory, right-click on the folders named "venv" and "git." In the context menu that appears, choose "Add to .gitignore" and click on it.

Version Control with Git

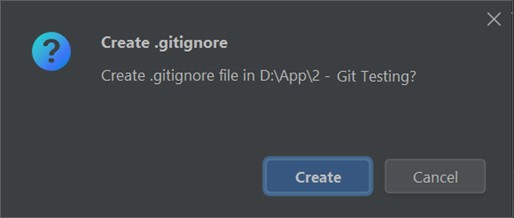
A prompt will appear asking if you want to create a .gitignore file. Select "create" in this prompt. As a result, you'll notice that a .gitignore file has been successfully created.

Version Control with Git

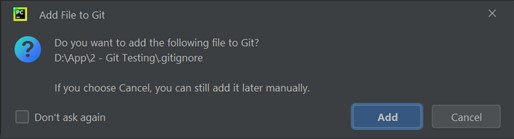
Next, you should click on "Add" to include the .gitignore file.

Version Control with Git

So, what we just did is we made a change by adding the venv folder to the .gitignore file, ensuring that Git won't track it. Similarly, we also excluded the hidden .idea folder, which contains PyCharm settings files, from version control. You can type in the name of the folder or file in the .gitingnore file as shown:

Version Control with Git

To commit your changes to PyCharm, simply click the green checkmark icon at the top right corner of the window. You'll notice that the ".gitignore" file is checked by default; this happens because we previously pressed the "add" button when creating the ".gitignore" file. PyCharm asked if you wanted to add it, and we did. To include other files in the commit, you can either manually check them one by one or use the "always add" option, which will automatically select them for you. This simplifies the process of adding multiple files to your commit.

Version Control with Git

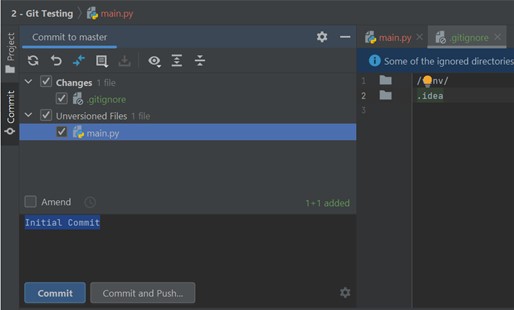
After making your changes, click the "commit" button. A window will appear asking you to enter your name and email. Simply provide the requested information and click "OK" to continue. Please note that this window will only appear the first time and won't be asked again.

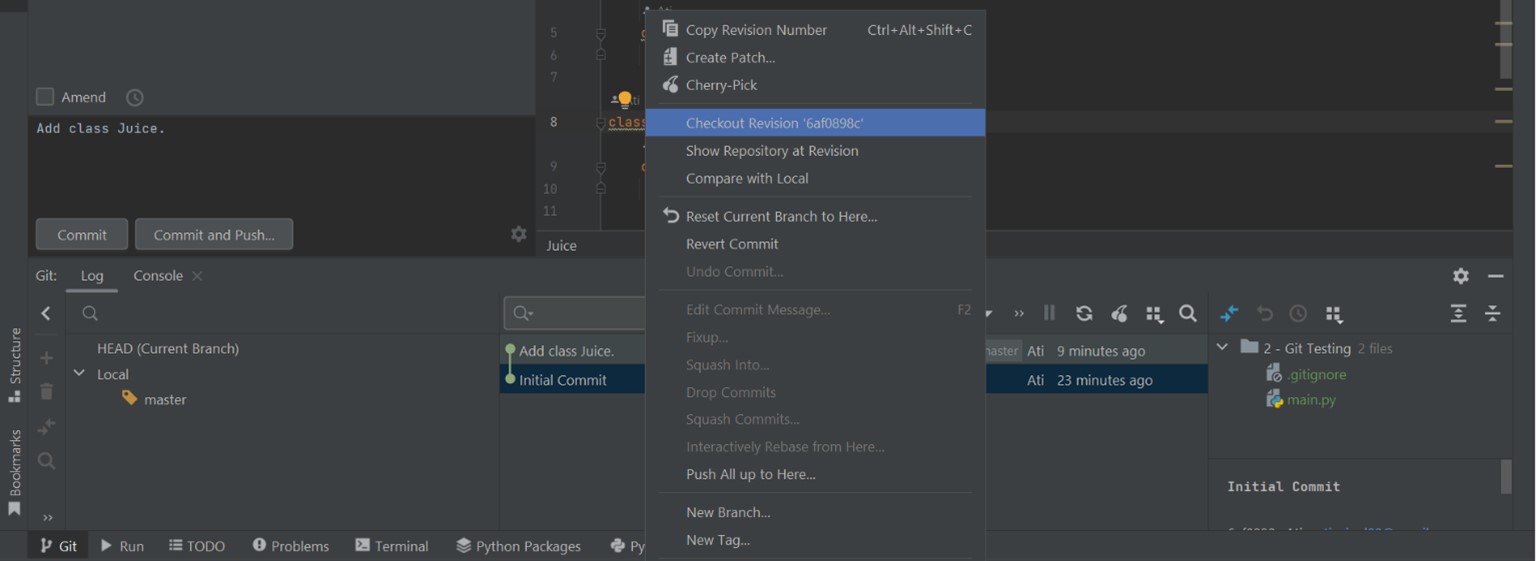
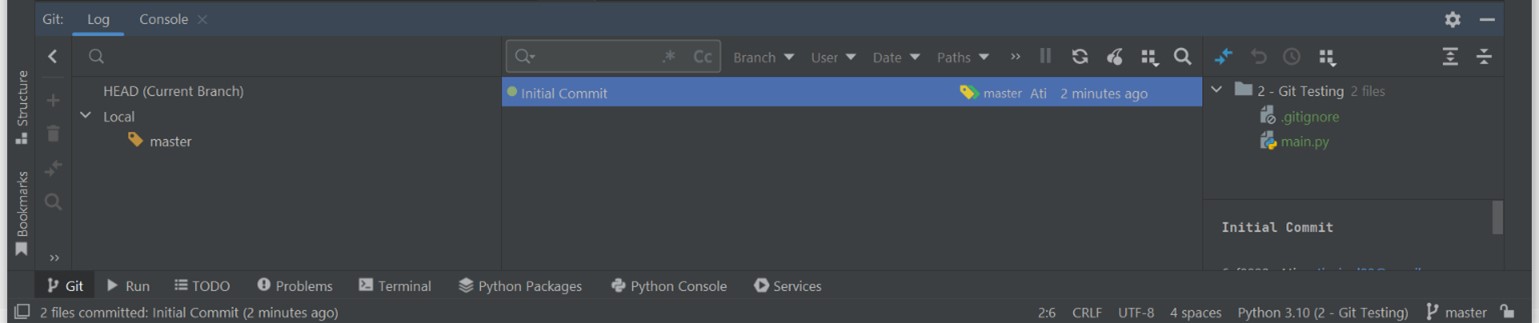
To view a file that you've previously committed in Git, follow these steps for clarity: First, go to the Git tab found at the bottom of your window. Next, double-click on the "Initial Commit." This action will reveal a list of files on the right side of that section, making it easy to access and review your committed files.

Version Control with Git

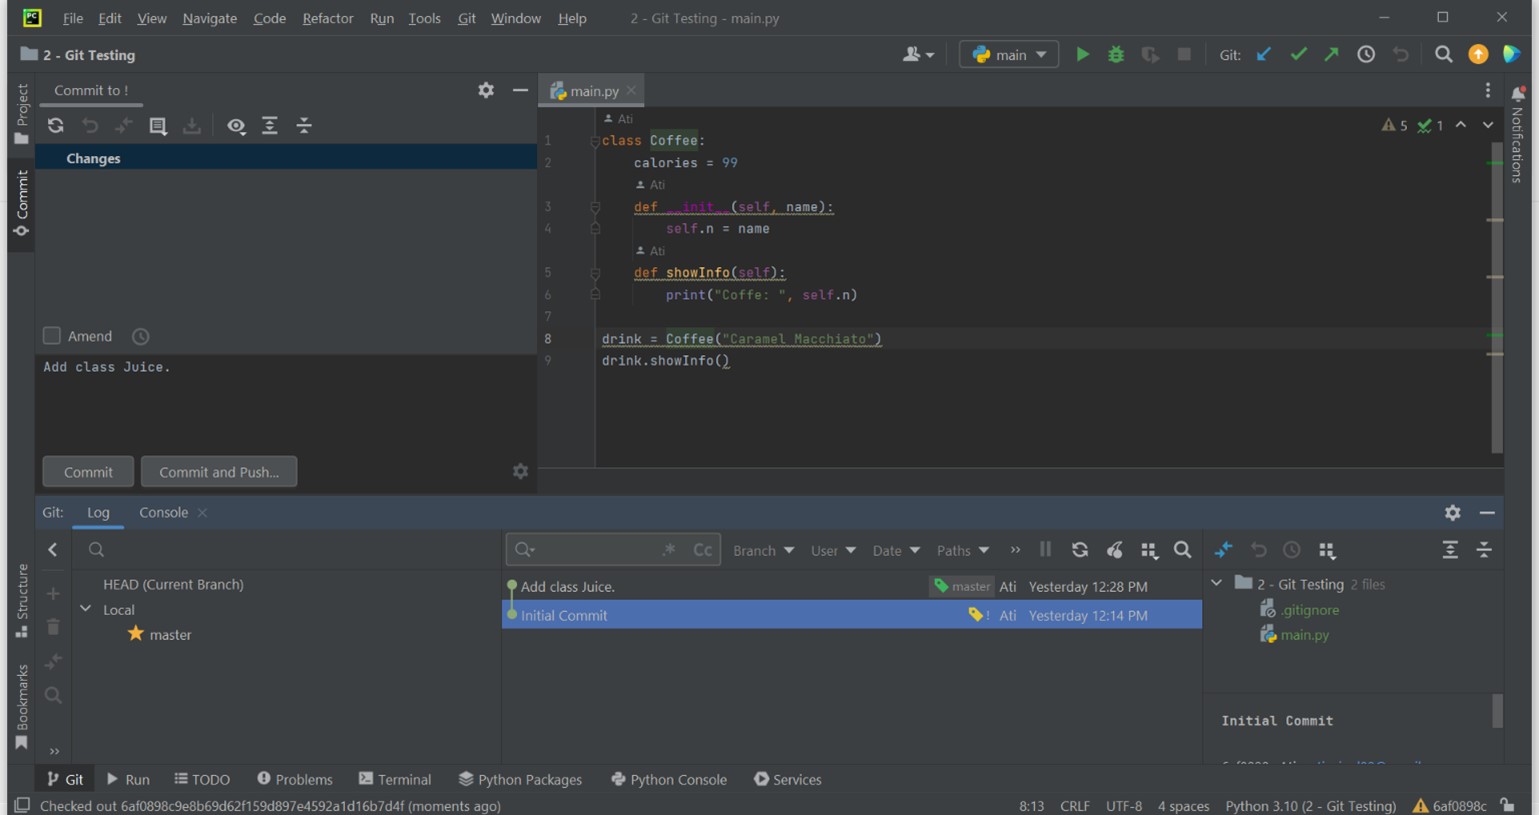
Now, suppose that we've made changes to our 'main.py' file. Initially, the code in 'main.py' looks like this:

class Coffee:
    calories = 99
    def __init__(self, name):
        self.n = name
    def showInfo(self):
        print("Coffe: ", self.n)

drink = Coffee("Caramel Macchiato")
drink.showInfo()

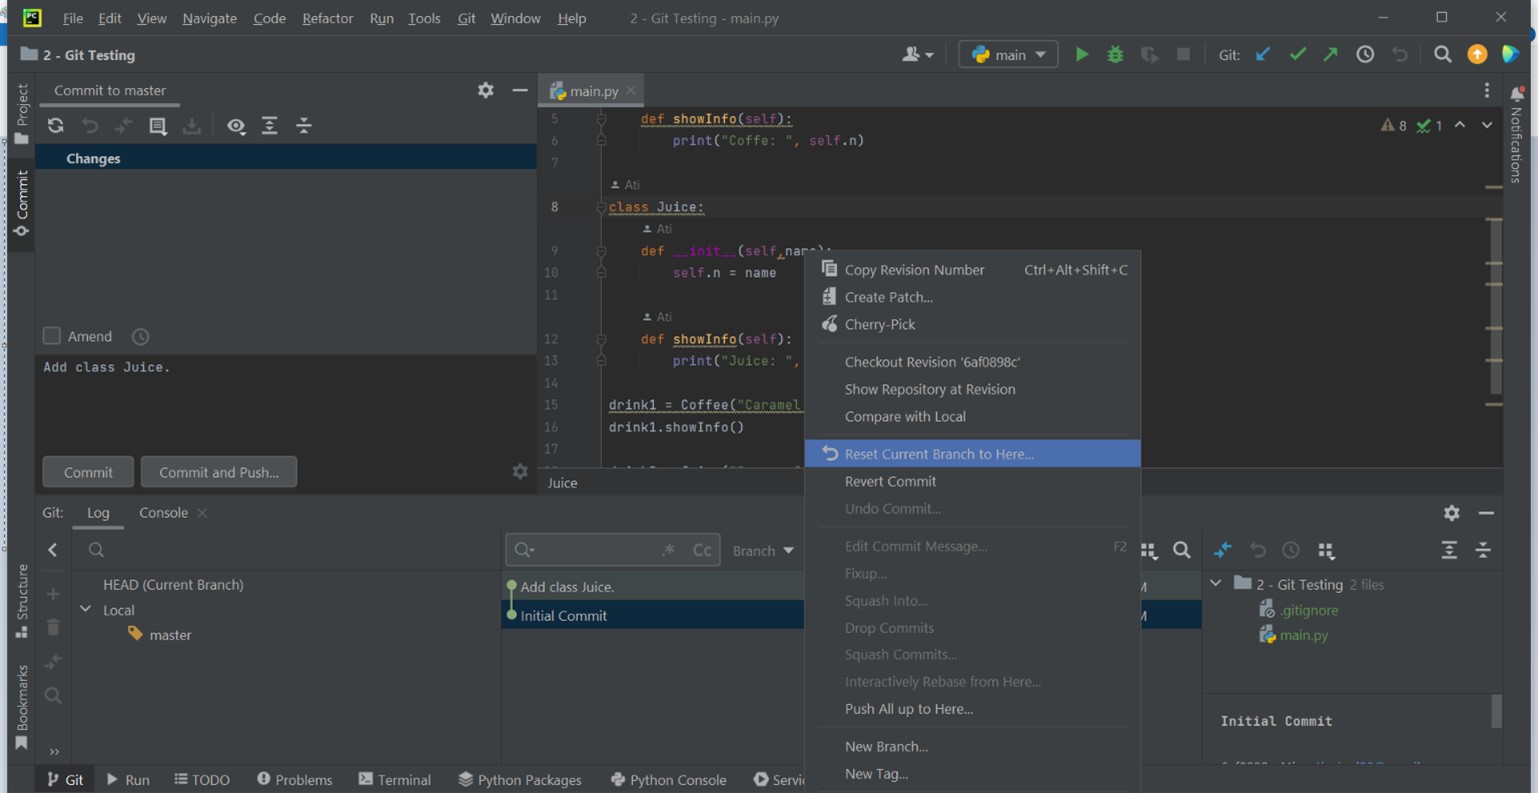
We're going to include a new class named ‘Juice’ in our code and save these changes. To do this, go to 'main.py' file and input the provided code.

class Coffee:
    calories = 99
    def __init__(self, name):
        self.n = name
    def showInfo(self):
        print("Coffe: ", self.n)

class Juice:
    def __init__(self,name):
        self.n = name

    def showInfo(self):
        print("Juice: ", self.n)

drink1 = Coffee("Caramel Macchiato")
drink1.showInfo()

drink2 = Juice("Orange Juice")
drink2.showInfo()

Version Control with Git

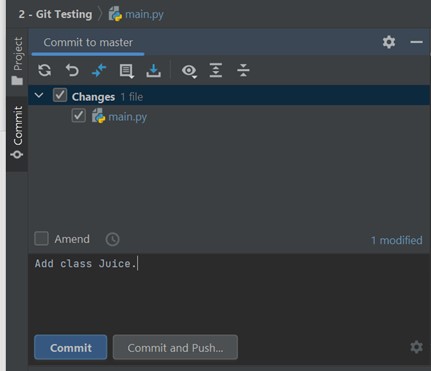
After making your changes, click the green checkmark icon in the top-right corner of the window to save your work. When you go to the commit tab, you'll notice that the 'main.py' file is automatically selected because it detects the changes you've made to it. Write a new message, for example: “Add class Juice.”. Then, press “commit” as shown above.

Version Control with Git

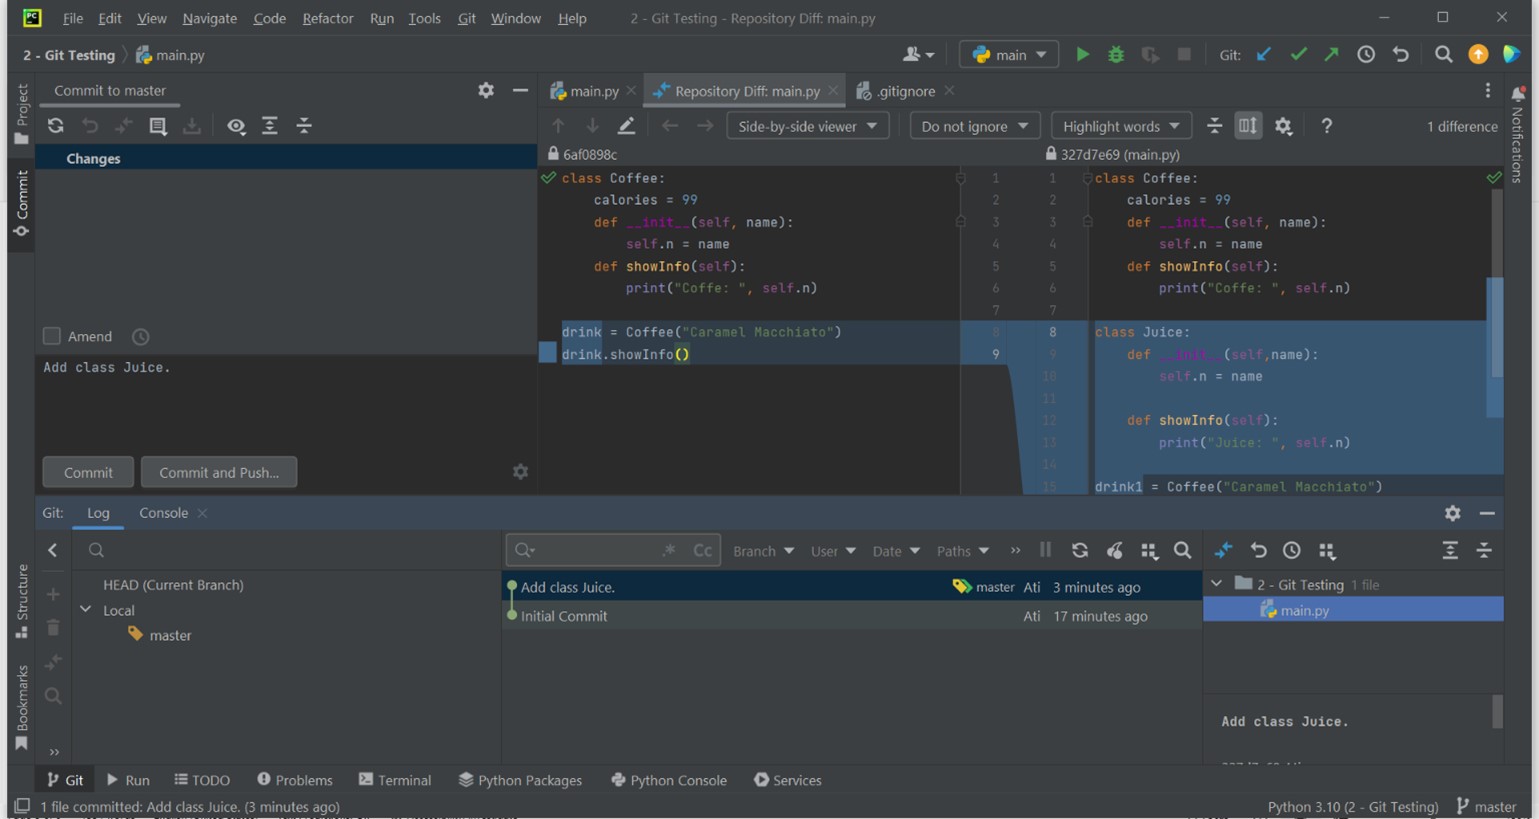
To review the code changes we've made, from the very beginning (the "initial commit") up to the point where we added the "Juice" class, you can simply navigate to the Git tab located at the bottom of the window. From there, you can easily explore and visualize all the changes made to your code.

Reverting to a Specific Timestamp in Git

Git is a powerful version control system that allows you to track changes in your codebase over time. Sometimes, you may need to revert your codebase back to a specific point in time, whether it's to undo recent changes or to recover an earlier state of your project. Git provides two primary commands for achieving this: git checkout and git reset. In this section, we'll explore how to use these commands and when to choose one over the other.

When to Use Each Command

  • Use git checkout when you want to temporarily inspect an older state of your project without affecting your current branch. This is useful for viewing code, copying files, or referencing an old version.
  • Use git reset when you want to permanently move your branch pointer to an earlier commit, effectively discarding all changes made after that point. This is more suitable when you're certain that you want to revert to an older state and don't need the recent changes.

Git Checkout

To perform a Git checkout in PyCharm, follow these steps: right-click on the file you want to work with, then choose "Checkout Revision" followed by the specific revision number (XXXXX) you want to switch to. Note that the actual revision number (XXXXX) might vary depending on your computer or the specific Git history of your project.

Version Control with Git

Version Control with Git

Now, let's take a look at the program's previous version, which is the state it was in when we initially made the commit. You'll notice a yellow tag with an exclamation mark next to it. This tag appears when we used the checkout option, indicating that this is now the current version of the program we're viewing. However, keep in mind that the "Add class juice" feature is still a commit, and it's still present in this state. So, if your intention is to permanently go back to this specific commit, the checkout command isn't the right one to use. Checkout is primarily for quickly checking the program's state or running it to see the current output. For permanent changes, you should use the reset command instead.

Now we are currently in here, you see the tag, but then you want to right click here after you have seen that previous state of the program. Now, let’s say, you want to go to the “Add class juice” which is the master. You can do that by moving the cursor to “Add class Juice”, right click, and select “checkout”, then “master”. You see that now the yellow tag went back to the “Add class Juice”.

Git Reset

The "reset" command functions somewhat differently compared to other actions in the version control system. To initiate a reset, you can follow these steps: First, right-click on the "initial commit" in your version control interface. Then, from the context menu that appears, choose the option titled "reset current branch to here...". Select “Hard” then click “Reset”.

Version Control with Git

Version Control with Git

This "reset" operation is a powerful and nuanced feature within version control systems like Git. It allows you to manipulate your branch's position, effectively repositioning it to a previous commit. By selecting "reset current branch to here," you're signaling your intent to move your branch pointer to the selected commit, effectively discarding any subsequent commits made after that point. This action can be useful for undoing changes or for branching your development in a different direction based on a previous state of your codebase.

It's important to exercise caution when using the reset command, as it can rewrite history and potentially lead to data loss if not used carefully. It's often recommended to create a backup branch or stash your changes before performing a reset to ensure you can recover any work if needed.