Overview

Blinking LED is the simple basic project created using Arduino. LED (Light Emitting Diode) is an electronic device, which emits light when the current passes through its terminals. LED's are used in various applications. It is also used as an ON/OFF indicator in different electronic devices.

Now, let us start with a simple blinking LED using the Arduino board. It is a simple circuit yet plays an important starting block that can be further used and developed in the future.

What You Need?

Before starting the experiment, you may prepare the following components :

  • 2 units of jumper wires (male to male)
  • 1 unit of 330 ohm resistor (Orange-Orange-Brown-Gold)
  • 1 unit of LED (red/green/yellow)
  • 1 unit of solderless breadboard
  • 1 unit of Arduino UNO board
Electronic components required for building blinking LED circuit (jumper wires, 330 ohm resistor, an LED, a solderless breadboard, and Arduino UNO board)

Background Knowledge

Before we begin, we need to understand some basic knowledge such as what is an LED, how it works, how electric circuit works and so on. Now, let us go through them one by one in this article so that we will have less trouble constructing and understanding the circuit later.

LED: Operation & Polarity

LED Structure Which Consist of Epoxy Lens, Reflective Cavity, Bond Wire, LED Chip, Anode, and Cathode

LED stand for light emitting diode, and one of diode characteristic is allowing current to flow in one direction. This means that LED has polarity, and you need to properly place it correctly following the right sign.

How it works? When an electrical current passes through a microchip, which illuminates the tiny light sources we call LEDs and the result is visible light. To prevent performance issues, the heat LEDs produce is absorbed into a heat sink [1]. Figure here shows the common structure of an LED [2].

Now we have covered what an LED is, the next thing to know is how to determine its polarity. This is an important step as the polarity will determine how we will connect LED in the circuit. In this section, we had listed 4 methods of determining the LED polarity:

Method #1 – Leads length

Determining The Polarity Of LED By Observing The Leads Length

This is one of the easiest ways to know LED polarity. The longer lead length indicate that the terminal is positive (anode), while the shorter is negative (cathode) [3]. This is represented in the figure here.


Method #2 – Flat Side

Determining The Polarity Of LED By Observing the LEDs Flat Side

If you look closely, you will see that the LED has a flat surface. This is not a manufacturing defect; rather, it is a mark that makes it simple to identify the polarity of the LED [4]. As shown in figure below, lead next to this mark is negative, another one is positive.

Method #3 – Flag Shape

Determining The Polarity Of LED Via The Metal Plate Shape

If you look closely inside of an LED, you can see two metal plates. As shown in figure below, you may notice the flag shape metal plate or the bigger plate, which indicates that it is negative. Whereas the other one is positive.

Method #4 – Multimeter

Determining The Polarity Of LED Using Multimeter

Multimeter is very useful equipment in electronics. If you have a multimeter, you can use it to know the LED polarity just by touching its leads with probe. The positive lead is where you red probe touches an LED and negative lead is where you have a black probe [5].

Electricity Current Flow

Now that we understand that LED has a polarity, we need to know about the electric current. An electric current is a flow of electric charge. Electric charge can be positive or negative. Opposite signs of electric charges attract each other while the same signs of electric charges repel each other. In addition, a negative charge ion can be referred to as an electron, and a positive charge ion can be referred to as proton.

Electron And Proton Behavior Toward Each Other

In electric circuit, the one that is moving is the electron. Due to this flow of charge, electricity is produced. When we see a component that has polarity, such as LED, we need to connect it according to its sign. For instance, if the connection is between GND pin and any digital pin, the negative leg of LED should always be connected to the GND, and the positive leg of LED should be connected to the digital pin.

In other cases, let say we want to construct a simple LED circuit without using Arduino board, but replace it with battery, the negative leg of LED should always be connected to the negative terminal of the battery, and the positive leg of LED should always be connected to the positive terminal of the battery as shown in . From figure below, we can expect that the electron flow from negative terminal of the battery, going toward the LED, and reach the positive terminal of the battery.

The Electricity Flow In Close Circuit

Resistor

Resistor is the most common electronic component that you will see throughout this course. It has many functions such as for reducing current flow, adjusting the signal levels, dividing voltages, biasing active elements, and terminating transmission lines. Resistor has no polarity, which means that you can connect it without concerning either the terminal that you are going to connect it with is positive or negative. However, in electronics, it is important for us to know how to obtain the resistor value.

For electronics students, most of them are taught how to manually calculate resistor value based on the resistor color code table. However, there are several ways to bypass the manual calculation. If you already have a resistor, and you want to measure its resistance, go to the following link:

Resistance Calculator

Or, if you have a resistor and you want to know the resistor value, you can use a multimeter to measure it.

Solderless Breadboard

There are various ways on how to connect your electronic component. In this course, we will be using solderless breadboard to connect our component. Using solderless breadboard to connect electronics ease us in experimenting our circuit because we can easily attach and detach them from the board. However, breadboard provide two types of connection; horizontal and vertical. Refer to figure ‎below for further understanding of breadboard connection.

The connection in solderless breadboard (horizontal and vertical).

Hardware Setup

Now that we already covered the basic stuff, it’s time to construct our circuit. The hardware setup for this experiment is shown in the figure below.

Setting up experiment for blinking LED with Arduino UNO (required component: Arduino UNO, jumper wires, breadboard, LED, resistor)

Firstly, place the LED according to its polarity, the negative leg of led is connected to the resistor, and then the resistor is connected to the ground using a jumper wire. And the positive leg of LED is connected to the digital pin 13 header of Arduino UNO board using a jumper wire.

How It Works? (Hardware Setup)

The circuit is now a complete series circuit whereby current will flow through each component coming out of pin 13 of the Arduino board, into the LED, the resistor, and lastly going back into the GND header on the Arduino board as shown in figure below.

Explanation for the experiment of blinking LED with Arduino UNO (required component: Arduino UNO, jumper wires, breadboard, LED, resistor)

The Arduino controls the current whereby a command of HIGH output will supply a 5V into the circuit resulting in the LED lighting up. On the other hand, a LOW output will give a 0V and nothing will happen. By controlling the timing of the switch between HIGH and LOW, we can create a blinking LED sequence.

Software Setup

In the Arduino IDE, open a file in the examples section in this menu: File > Examples > 01. Basics > Blink A “Blink” sketch will be loaded up which will serve the purpose of this tutorial. Connect your Arduino board to your computer and click the “Upload” button to load the sketch into the board. Upon completion of the upload, your LED should start to blink. If it does not blink, check your circuit again if there are any loose or any faulty components. You can save this code in your computer. The extension for Arduino code is .ino. Below is the code for “Blink”:-

/*
  Blink
  Turns on an LED on for one second, then off for one second, repeatedly.

  Most Arduinos have an on-board LED you can control. On the UNO, MEGA and ZERO
  it is attached to digital pin 13, on MKR1000 on pin 6. LED_BUILTIN is set to
  the correct LED pin independent of which board is used.
  If you want to know what pin the on-board LED is connected to on your Arduino model, check
  the Technical Specs of your board  at https://www.arduino.cc/en/Main/Products

  This example code is in the public domain.

  modified 8 May 2014
  by Scott Fitzgerald

  modified 2 Sep 2016
  by Arturo Guadalupi

  modified 8 Sep 2016
  by Colby Newman
*/

void setup() {
  // initialize digital pin LED_BUILTIN as an output.
  pinMode(LED_BUILTIN, OUTPUT);
}

// the loop function runs over and over again forever
void loop() {
  digitalWrite(LED_BUILTIN, HIGH);   // turn the LED on (HIGH is the voltage level)
  delay(1000);                       // wait for a second
  digitalWrite(LED_BUILTIN, LOW);    // turn the LED off by making the voltage LOW
  delay(1000);                       // wait for a second
}

How it Works? (Software Setup)

The Blink sketch is the most basic sketch and is a great demonstration in learning the Arduino programming. It is the equivalent of the “Hello World!” coding when people start their C or Java programming.

At the beginning of programming a code, developer or programmer usually will write some information about the code. You will see the block comment, or a multi-line comment is marked by the symbol /* and the symbol */ marks its end. Arduino compiler reads the /*, and it ignores whatever comes after that until it encounters a */. You can use this whenever you want to add block comment in your code.

If you opt to write a one-line comment, you can use the symbol // as per displayed in most code line in blink code example.

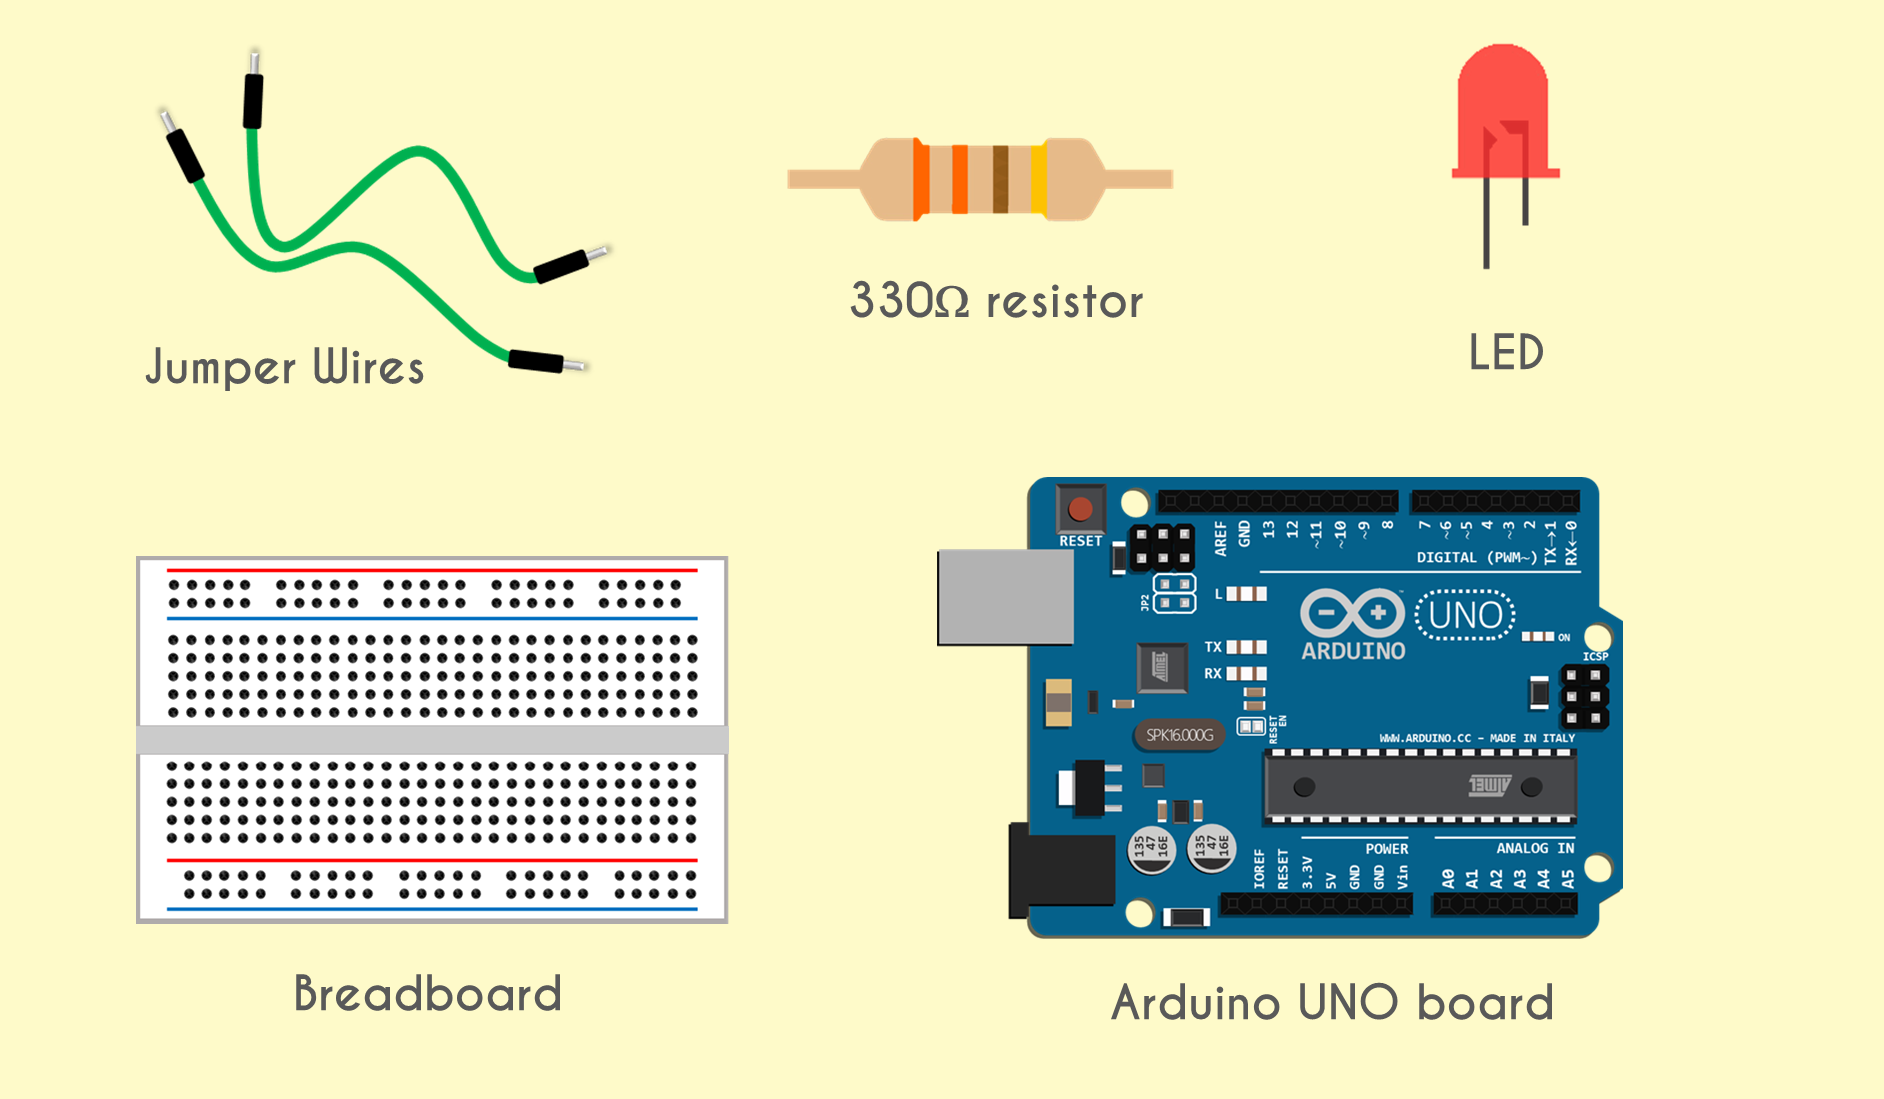
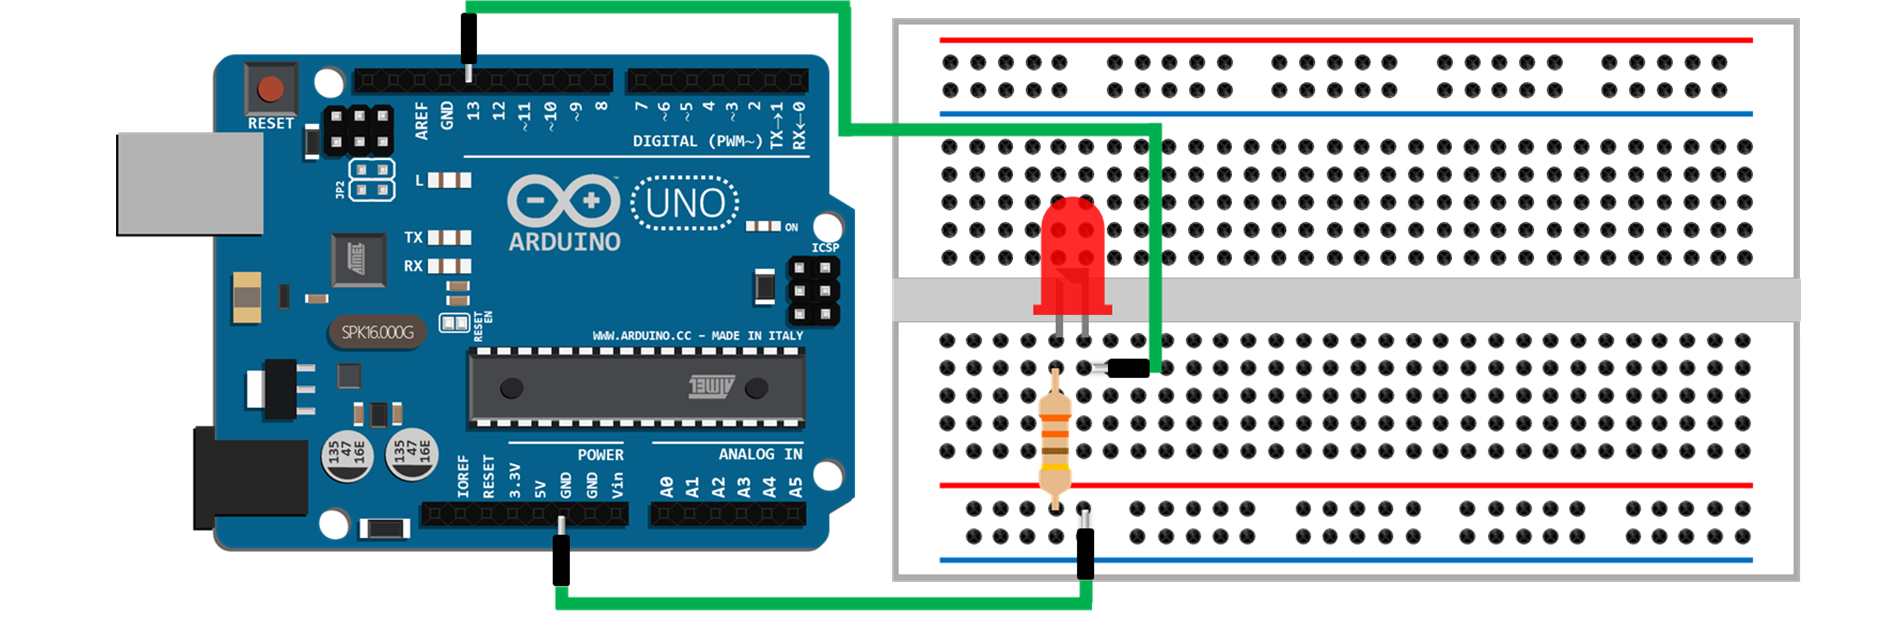
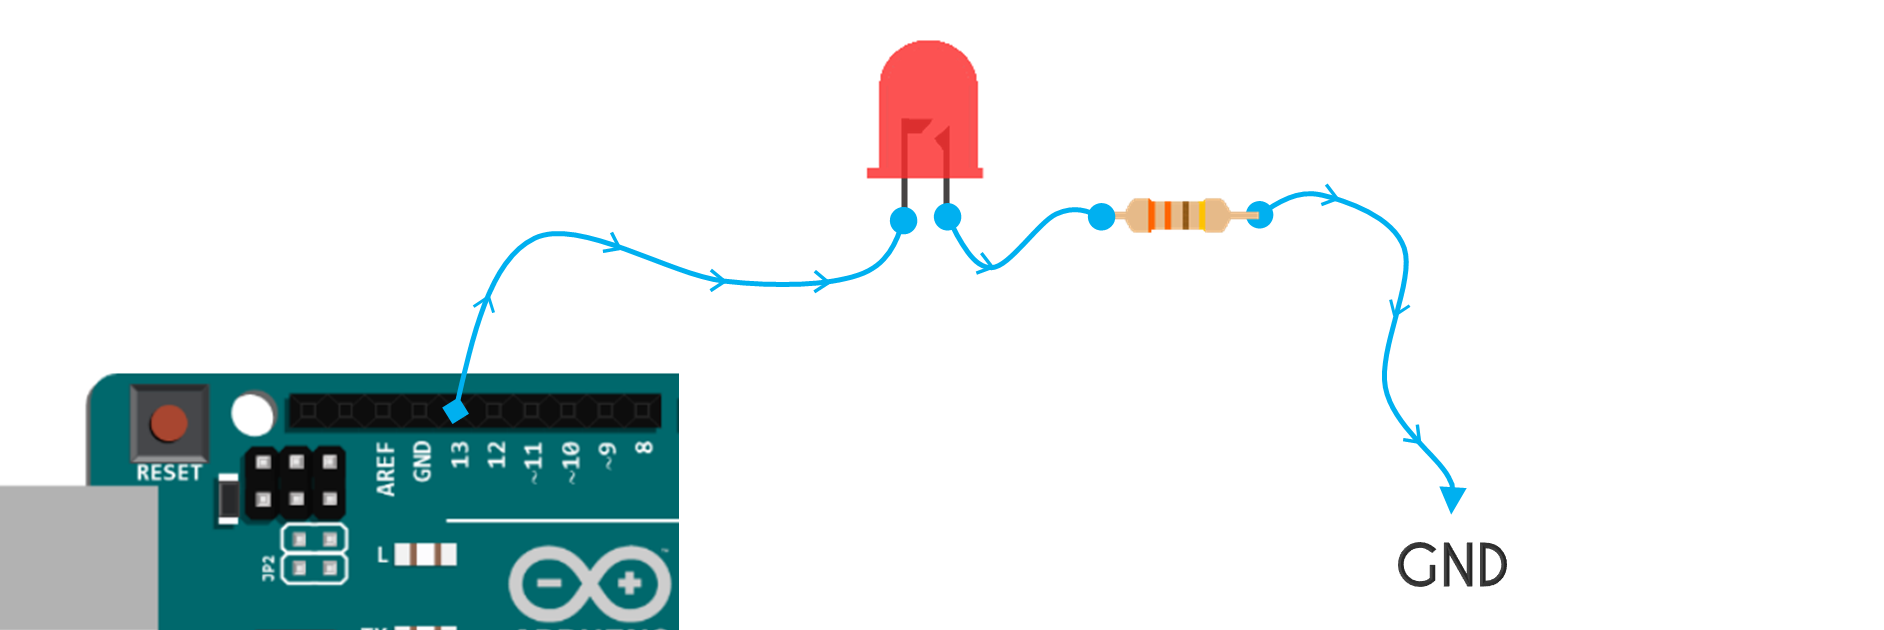
The next coding block is the void setup() block which is executed only once when the Arduino starts up. It is used for commands that we only need to execute once. Here, we want to declare digital pin 13 as an output. However, notice that the code LED_BUILTIN is used, where in this case, it means that we are initializing the built in LED that is internally connected with digital pin 13 as output. Consequently, we used digital pin 13 to be connected with external LED in this experiment. So, this is also correct.

Lastly, we have the third block of the sketch, the void loop() that will be executed over and over until the power is cut off. In this sketch, we have two sets of digitalWrite() and delay() commands with different values as shown below:

void loop() {
  digitalWrite(LED_BUILTIN, HIGH);
  delay(1000);
  digitalWrite(LED_BUILTIN, LOW);
  delay(1000);
}

Note

The first digitalWrite(LED_BUILTIN, HIGH); will set the built in LED to HIGH by supplying current to that section.

The command that comes after, delay(1000); sets a pause (in milliseconds) for the code before executing the next line. In this case, the circuit will continue to have current for 1000ms, or 1 second.

Another digitalWrite(LED_BUILTIN, LOW); comes in after that but with a “LOW” command. This turns off the supply of current for that section and the LED is turned off.

Then, the code after that, delay(1000); sets a pause (in milliseconds) for the code before executing the next line. In this case, the circuit will continue to have no current for 1000ms, or 1 second.

This continues as the program loops back to the top digitalWrite(LED_BUILTIN, HIGH); and sets pin connected with built-in LED, or D13 pin to “HIGH” again.

End Of Article

End Of Article