The History...

The Internet

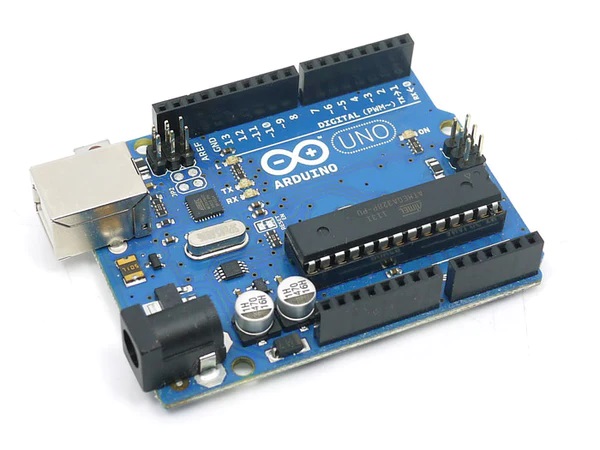
Here, is a picture of Arduino UNO. Some of you may have encounter this hardware before, maybe just physically look at it, without experiencing how to program it, and some are lucky perhaps, to already have experienced using this hardware.

When does it all started? Since it's first invention, it took over 10 years for Arduino to become popular as what we see now. It has been used by various sectors, including education.

In 2005, Massimo Banzi and David Cuartielles created Arduino, an easy-to-use programmable device for interactive art design projects. That invention, specifically the Arduino IDE, is built upon Wiring, a software project written by one of Banzi's students (Hernando Barragan)[1].

The very first Arduino board which was released in 2006 was the Arduino Serial did not even have a USB port. However, as the name implies, it had an older, Serial port for communicating with the chip. The microprocessor used for this board and the following USB kit is an Atmel Atmega8. This chip is the same family of microcontroller which is still used on the Uno to this day, called Atmega328. This first year of release, there was a frenzy of activity and development of maker boards which aligns with the timing of the maker/DIY boom. Massimo Banzi's intended Arduino board underwent new changes, switching to the Atmega168, which had twice as much memory as the Atmega8. The Atmega328 eventually made an appearance in the Duemilanove, Nano, Pro, and Pro Mini after several additional board modifications [2].

Knowing Arduino

Arduino History

We already know some history of Arduino, now we need to know what is Arduino. Arduino is an open-source electronics platform based on easy-to-use hardware and software. The hardware part of Arduino, sometimes refered as Arduino boards are able to read inputs, and turn the input into an output [2]. To do so we use the Arduino programming language (based on Wiring), and the Arduino Software (IDE), based on Processing.

Most Popular Arduino Board

Let's get to know some of the popular Arduino boards used by both engineers and hobbyists!

#1-Arduino Uno

Arduino UNO board

Arduino Uno is the most popular and widely used development board. It is powered by an ATMega328P processor operating at 16MHz, includes 32KB of program memory, 1KB of EEPROM, 2KB of RAM, has 14 digital I/O, 6 analog inputs, and both 5V and 3.3V power rails.


#2-Arduino Nano

Arduino Nano Board

The Arduino Nano is another popular Arduino development board very much similar to the Arduino Uno. They use the same Processor (Atmega328p) and hence they both can share the same program. The major difference between both is in term of their size. Arduino Uno is twice as big as Nano and hence occupies more space on your project. Moreover, Nano is breadboard friendly, means that you can place it into a breadboard easily, while Uno is not. In term of programming, if you want to upload the code, for Arduino Uno, you need a regular USB cable, whereas for Nano, you will need a mini USB cable.

#3-Arduino Due

Arduino Duemilanove Board or Arduino Due Board

The Arduino Due is the first Arduino board based on a 32-bit ARM core microcontroller. With 54 digital input/output pins, 12 analog inputs, it is the perfect board for powerful larger scale Arduino projects. What's make it so popular? Imagine that if you want to upgrade your basic project to another level, perhaps doing a lot of things at once, YES! Arduino Due is one the best option you should go with.

#4-Arduino Mega 2560

Arduino Mega 2560 Board

Arduino Mega 2560 is a development electronic board based on the Atmega2560 microcontroller. This board is a good match for projects that require more GPIO pins and memory space because it carries 16 analog pins and 54 digital I/O pins out of which 15 pins are used for PWM output. Mega has a flash memory of 256kB while that of Uno is 32kB. If the code is large, it is better to go with Mega due to the memory..

The Arduino IDE

Now, what is Arduino IDE? IDE here stands for Integrated Development Environment. It is a software application that helps programmers develop software code efficiently [3]. Arduino IDE is the application used for writing and uploading codes into Arduino board. IDE here stand for Integrated Design Environment which refer to a software for creating applications that integrate common developer tools into a single graphical user interface (IDE). Figure below shows a screenshot of Arduino IDE application.

Ardunio IDE

To use this application, you need to install it in your computer first. If you want to learn how to install Arduino IDE, check out the tutorial below:-

Understanding The Code Window - The Arduino IDE Button

There are several buttons with different icons displayed in the Arduino IDE. Each button have different functions. Refer to the table shown to know more about the function of each button [4].

  • Verify button or icon in Arduino IDE
    Verify Button

    This button will help you checks your code for errors.

  • Upload button or icon in Arduino IDE
    Upload Button

    This button is used to compile and upload code.

  • New button or icon in Arduino IDE
    New Button

    This button is for creating a new sketch. Once clicked, a new window (new sketch) will pop up.

  • Open button or icon in Arduino IDE
    Open Button

    This button is for opening the previously saved sketch.

  • Save button or icon in Arduino IDE
    Save Button

    This button is used to save the current sketch.

  • Serial Monitor button or icon in Arduino IDE
    Serial Monitor Button

    This button is for opening the serial monitor.

Programming an Arduino

Ardunio IDE

When it comes to programming an Arduino board, we need to understand both software and hardware behavior. Notice that, the structure of Arduino Programming Language contain void setup() and void loop() section as per shown in Figure above.

void setup() This is a function that will only run once, after we powerup the Arduino board, or after we reset the Arduino board. Usually, in this function, the programmers will tell the Arduino board about the inital setup of the component, either the component used are going to be an output or input. However, it depend on the nature of the project. But in most of the cases, this function is used to initializes and sets the initial values.

void loop() This is a function that will loop as long as there is power supplied to the Arduino board. Once programmers had initiallize all the initial setup, they will use this function to control the Arduino board.

In Arduino, we usually called the Arduino code files as 'sketch'. When you open up a new 'sketch' file in Arduino IDE, you will see the void setup() and the void loop() function are already there.

End Of Article

End Of Article